Control which files are included when publishing an ASP.NET project
The point of this post
In a default ASP.NET project configuration, all files (except code-behind files) included in a project are copied to the target location when publishing a project or creating a deployment package.
However, quite often we need to customize this behavior to suit our specific projects, especially when setting up automated builds - for example for continuous integration or for when we do a manual publish from within Visual Studio.
The Publish command is actually quite useful, and I just wrote a brief summary on how to deploy a website to a remote server using the Publish command in Visual Studio.
This post goes through some project modifications to include additional files, and also to exclude specific folders, when a website is published or when a deployment package is created.
Copy additional files not included in the project
There are times when you want to include files that are not included in the project. One example is when you have files that are created when the project is compiled, such as during post-build events.
Common examples are JavaScript and CSS files that are compressed/minified as part of the build process. We never include minified files in the project as they should be updated on every build, and we don’t want to include them in source control. However, we still want these non-project files to be copied as part of a publish or deploy action.
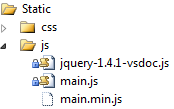
For example, here we see our original JavaScript file called main.js, which is included in the project – but we also see the minified version called main.min.js, which is updated every time the project is built and excluded from the project:
Including additional files in publish and deploy scenarios
To include additional files not included in the project we’ll add some XML declarations to the .csproj project file. To edit it in Visual Studio we first right-click the project node in Solution Explorer and select Unload Project:
Next we right-click the project node again and click Edit [project file name] to manually edit the project file (you could also manually edit the .csproj file through Notepad or your preferred editing tool):
Next, we locate the line that says:
<Import Project="$(MSBuildExtensionsPath32)\Microsoft\VisualStudio\v10.0\WebApplications\Microsoft.WebApplication.targets" />
To copy additional files when our project is published (or deployed through an automated build) we define an additional MSBuild target called CustomCollectFiles beneath the <Import> element above. This target extends the CopyAllFilesToSingleFolderForPackageDependsOn target (phew!) which controls which files are copied in a publish or deploy scenario.
<PropertyGroup>
  <CopyAllFilesToSingleFolderForPackageDependsOn>
    CustomCollectFiles;
    $(CopyAllFilesToSingleFolderForPackageDependsOn);
  </CopyAllFilesToSingleFolderForPackageDependsOn>
</PropertyGroup>
Next we specify which files should be included in this new CustomCollectFiles target by adding additional XML declarations beneath the <PropertyGroup> element we added. The following example copies all minified JavaScript and CSS files when the project is published or deployed:
<Target Name="CustomCollectFiles">

  <!-- Copy minified JavaScript files -->
  <ItemGroup>
    <CompressedScripts Include="Static\js\*.min.js" />
    <FilesForPackagingFromProject Include="%(CompressedScripts.Identity)">
       <DestinationRelativePath>Static\js\%(RecursiveDir)%(Filename)%(Extension)</DestinationRelativePath>
    </FilesForPackagingFromProject>
  </ItemGroup>

  <!-- Copy minified stylesheets -->
  <ItemGroup>
    <CompressedStylesheets Include="Static\css\*.min.css" />
    <FilesForPackagingFromProject Include="%(CompressedStylesheets.Identity)">
      <DestinationRelativePath>Static\css\%(RecursiveDir)%(Filename)%(Extension)</DestinationRelativePath>
    </FilesForPackagingFromProject>
  </ItemGroup>

</Target>
Note that for each group of files we first declare an element with a name for the group, such as <CompressedScripts>. This is now a variable that we can use for the <FilesForPackagingFromProject> element, above seen as %(CompressedScripts.Identity).
When we’re done modifying our project file we right-click the project node in Solution Explorer and click Reload Project.
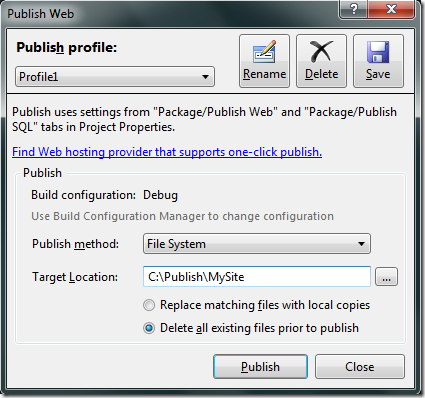
Now, if we choose to Publish the project…
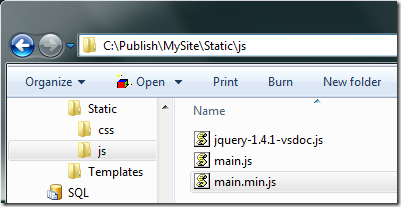
…even though the minified JavaScript file isn’t included in the project…
…it’s still included among the published files:
Exclude specific project folders
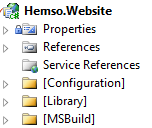
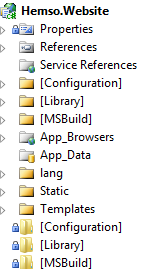
We often add multiple resource folders to our projects, and by convention we name them inside brackets:
Although required for development, we don’t want these folders to be included when the website is published. So, we edit our project file like we did for file inclusion earlier, but instead we add one or more <ExcludeFromPackageFolders> elements inside an <ItemGroup> element.
The following ensures the three resource folders above are excluded from publish and deployment package scenarios:
<ItemGroup>
  <ExcludeFromPackageFolders Include="[Configuration]">
    <FromTarget>Project</FromTarget>
  </ExcludeFromPackageFolders>

  <ExcludeFromPackageFolders Include="[Library]">
    <FromTarget>Project</FromTarget>
  </ExcludeFromPackageFolders>

  <ExcludeFromPackageFolders Include="[MSBuild]">
    <FromTarget>Project</FromTarget>
  </ExcludeFromPackageFolders>
</ItemGroup>
Now, even though multiple folders are included in our project…
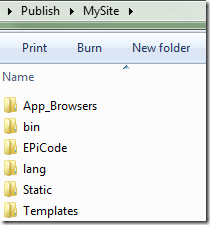
…they’re not included when the website is published:
Note: a side-effect of excluding folders this way is that the folder names will be displayed twice in Solution Explorer, I haven’t figured out if there’s a way around this.
